Charred Wood Blog
A Guide to Internal Wood Wall Cladding

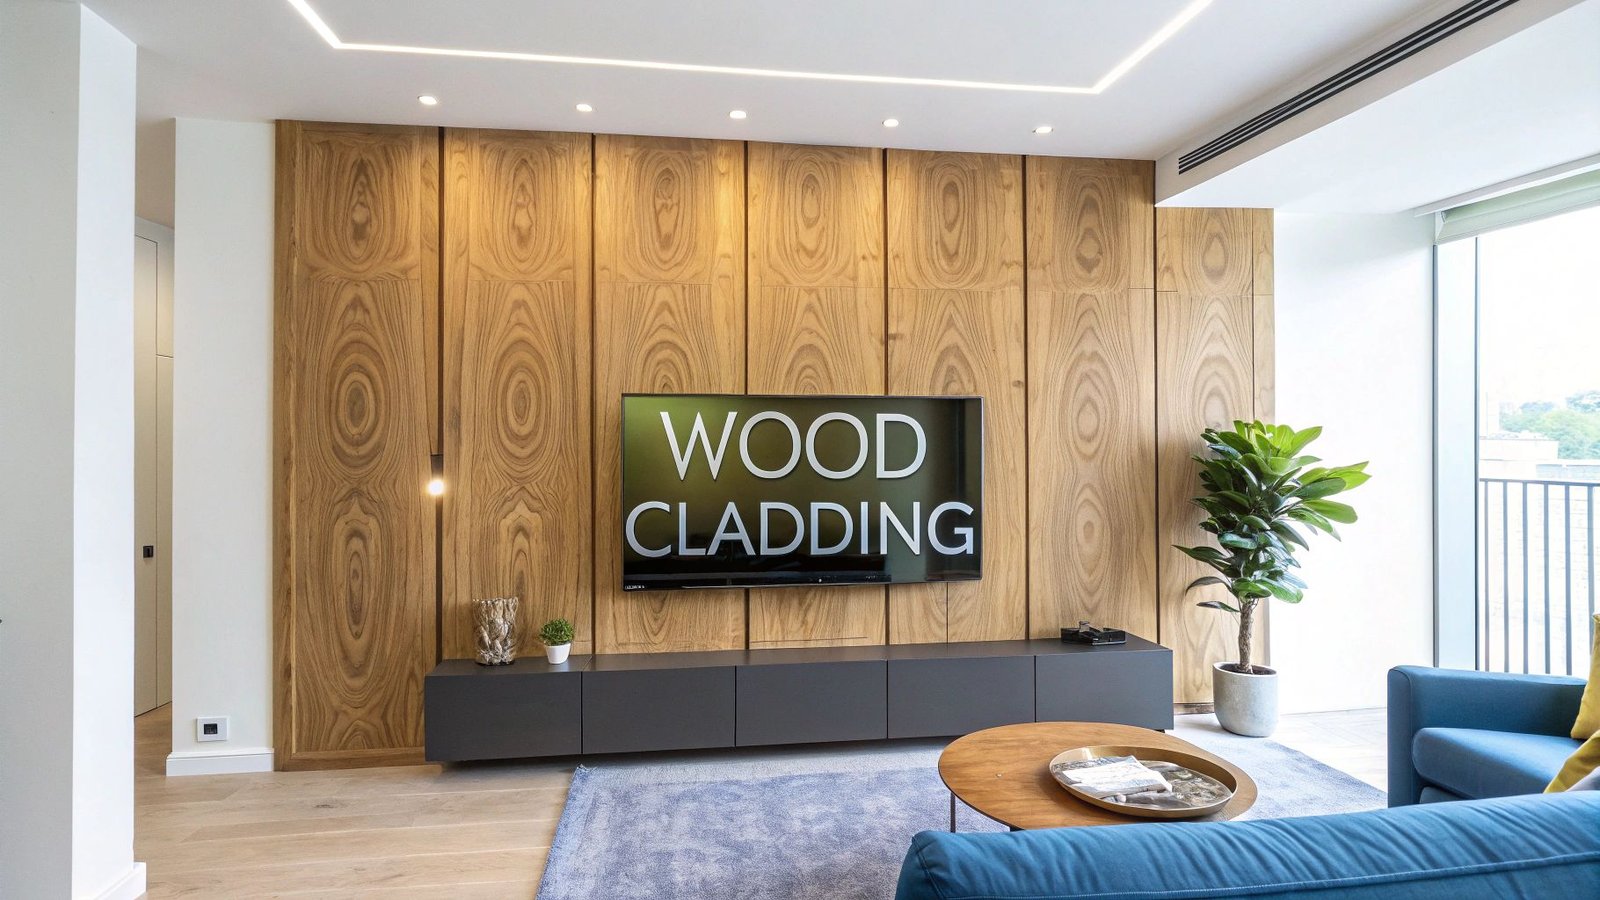
Internal wood wall cladding is an interior wall finish that uses natural or engineered timber panels, including pine, oak, cedar, or Yakisugi. It enhances thermal insulation, improves sound absorption, helps regulate indoor humidity, and adds distinctive architectural character to both residential and commercial spaces.
When referring to internal wood wall cladding, the concept goes beyond simply covering a wall. It represents a deliberate design choice that applies timber panels to interior surfaces, introducing natural texture, warmth, and architectural character. This approach transforms a plain, flat wall into a defined feature element that can significantly reshape the visual identity of a room.
The article defines internal wood wall cladding and outlines its practical advantages, including improved insulation, enhanced acoustic comfort, and long-term durability. It examines timber species, layout and design patterns, installation stages, maintenance requirements, and key UK cost considerations.
Bringing the Outdoors In: The Natural Warmth of Wood Cladding
Internal wood cladding gives walls a bespoke finish that adds style and an organic, inviting feel to a home. It replaces standard paint or wallpaper with a natural surface that transforms cold, sterile spaces into warm, welcoming environments with visible character.
Its popularity in UK homes has increased because homeowners want natural, sustainable materials that feel authentic. Mass-produced finishes create identical interiors, while wood provides a direct connection to the natural world. Each plank displays unique grain patterns, knots, and subtle colour shifts, ensuring that no two walls look the same.
In open-plan layouts that link interiors to patios or terraces, designers often extend interior tones outdoors to maintain visual continuity. Materials such as black charred wood decking are commonly used to mirror interior finishes, creating a seamless transition between inside and out.
More Than Just a Pretty Face
Internal wood cladding does more than cover a wall; it introduces physical and sensory qualities that standard surface materials cannot replicate. Wood cladding adds measurable texture and structural depth that plays with daylight shifts, shadows and highlights that move across the timber. This layered surface gives rooms a sophisticated yet comforting atmosphere grounded in material authenticity.
Internal wood cladding improves how a space feels through three core qualities:
- A Tactile Experience: Whether sanded smooth or left rustic and rugged, timber delivers something that instinctively makes you want to reach out and touch it.
- A Quieter Home: Wood functions as a natural sound absorber. Timber surfaces help reduce echo and soften ambient noise, supporting a calmer and more controlled acoustic environment in residential interiors.
- A Link to Nature: Wood introduces a direct natural element into indoor spaces. This aligns with biophilic design principles, which are associated with reduced stress and improved overall well-being.
Wood cladding fundamentally changes how you experience a room. It shifts the focus from something purely visual to a multi-sensory experience, creating a space that feels grounded, authentic, and truly liveable.
Your Complete Guide to Wood Cladding
This guide is your go-to resource for any wood cladding project you’re considering. It walks you through the entire process, from understanding the practical benefits and choosing the right timber to completing the installation and finishing touches correctly. You’ll find everything you need here to confidently bring your vision to life. Let’s get started.
The Practical Benefits of Using Wood on Interior Walls
It’s easy to appreciate the look of a timber-clad wall, but the real value lies in what sits beneath the surface. Choosing wood for interior walls improves how your home feels and functions every day, making it a practical decision as well as a design choice. It acts as an investment in comfort, quiet, and a healthier living environment.
One of the standout benefits is wood’s natural insulation properties. Timber has a cellular structure that traps air, helping to create a barrier against the cold. For homeowners in the UK, this can mean a warmer home during long, chilly months and the potential to reduce heating costs.
Wood cladding works particularly well in rooms that feel draughty or on north-facing walls that struggle to retain warmth. Adding a layer of timber introduces thermal resistance that paint or wallpaper cannot provide, helping the room feel noticeably warmer and more comfortable.
Creating a Quieter and Healthier Home
Wood does more than retain warmth; it also helps reduce noise. Unlike hard surfaces such as plasterboard that reflect sound, the porous structure of wood absorbs it. This natural sound absorption reduces echo and ambient noise, making interiors feel calmer and more controlled.
This sound-dampening effect can significantly improve open-plan living areas and home offices. Wood cladding softens reflected sound without relying on additional soft furnishings such as rugs or cushions.
Wood can also support a healthier indoor environment. As a natural, breathable material, timber absorbs and releases moisture from the air, helping regulate indoor humidity levels. This contributes to a more stable and comfortable indoor climate throughout the year.
- Noise Reduction: Wood cladding helps soften harsh sounds and reduce reverberation, making it suitable for media rooms and living areas.
- Improved Air Quality: Natural wood does not release harmful volatile organic compounds (VOCs) associated with some synthetic materials.
- Humidity Balance: Timber absorbs and releases moisture, helping moderate indoor humidity for a more comfortable environment.
A Lasting and Valuable Investment
Wood offers durability and timeless appeal, making it a strong long-term investment for your home. Paint colours and wallpaper trends change frequently, but a well-maintained timber wall retains its appearance for decades. Timber wall cladding introduces a sense of quality and permanence that can enhance perceived property value.
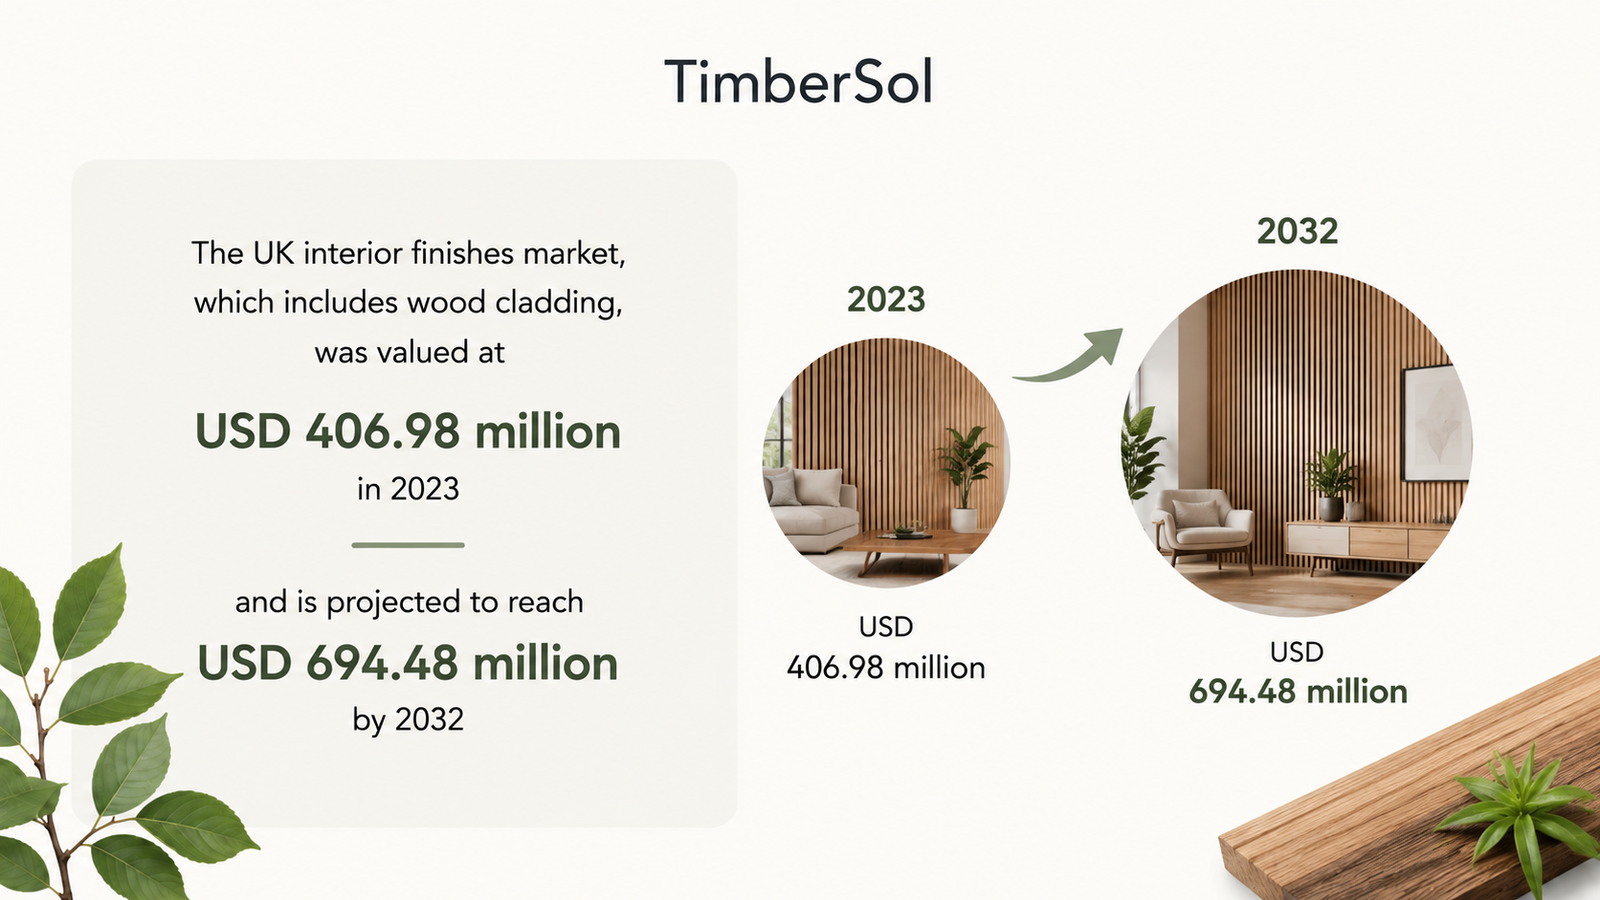
This shift towards natural, sustainable materials isn’t just a hunch. The UK interior finishes market, which includes wood cladding, was valued at USD 406.98 million in 2023 and is projected to reach USD 694.48 million by 2032. This growth indicates sustained interest in materials that combine aesthetics with practical performance. You can read more about the UK interior finish market trends on Credence Research.
Choosing internal wood wall cladding goes beyond decoration; it functions as a strategic interior upgrade. Timber surfaces contribute to warmer rooms, improved acoustic comfort, and a healthier indoor environment while adding lasting character.
Installing wood on interior walls improves everyday living conditions. It addresses common issues such as chilly rooms and noisy spaces with one solution that combines form and function, making it a compelling choice for any home.
Choosing The Right Timber For Your Project
Choosing the right timber for your internal wood wall cladding determines the character of the entire space. Each wood species brings distinct visual and material qualities, which influence the room’s aesthetic and overall atmosphere. It’s important to remember that not all timbers share the same properties, so understanding their differences is essential for achieving a strong final result.
The best choice balances appearance, practicality, and budget. Some timber species provide rustic charm at a more accessible price point, while others deliver refined elegance and long-term durability. Selecting timber becomes a clear alignment between your design vision and the natural characteristics of the wood itself.
Where the brief calls for warm tonal variation and stronger grain definition, douglas fir wood cladding provides greater architectural presence than many standard softwoods.
Softwoods: A Rustic and Accessible Choice
Softwoods such as Pine and Cedar are a popular choice for internal wood wall cladding when the goal is a warm, rustic aesthetic at an accessible cost. For lighter, cleaner-looking interiors, spruce cladding is often selected for its uniform texture and subtle grain, making it well suited to minimalist wall schemes. These timbers are generally lighter in colour and weight, which makes them easier to handle and install for both DIYers and professional fitters.
Pine remains a classic option because its prominent grain and visible knots create an immediate Scandinavian or country-style character. Cedar stands out for its richer, reddish tones and distinctive natural aroma, which introduce a strong sense of organic warmth into interior spaces.
Softwoods are less dense than hardwoods, which affects durability rather than appearance. Their lower density means they are more susceptible to dents and surface scratches, especially in high-traffic areas such as hallways or busy family rooms.
Hardwoods: Durability Meets Timeless Elegance
Hardwoods such as Oak and Ash provide a durable and refined solution for internal wood wall cladding. These species are known for their strength, density, and defined grain patterns, which support long-term performance and add lasting character to a home.
Oak delivers a strong visual presence through its distinctive wavy grain and wide tonal range, from light honey shades to deep brown hues. Ash creates a lighter, more contemporary effect with its straight, clean grain, making it well suited to modern and minimalist interiors.
When comparing timber options, think about the bigger picture of material selection. Reviewing broader guidance on material selection for luxury home design can help place timber choice within a wider interior strategy.
Comparing Common Woods for Internal Cladding
This overview highlights several popular timber options and the qualities each one offers for internal wood cladding.
| Wood Type | Typical Cost | Durability | Appearance and Grain | Best Suited For |
|---|---|---|---|---|
| Pine | £ | Moderate | Light colour with prominent knots and a strong grain. | Rustic, Scandinavian, or country-style feature walls and ceilings. |
| Cedar | ££ | Moderate | Rich, warm reddish-brown tones with a fine, straight grain. | Creating a warm, aromatic, and natural ambience in living rooms or bedrooms. |
| Oak | £££ | High | Classic, strong grain patterns; available in a wide range of tones. | High-traffic areas and creating a timeless, traditional, or grand feel. |
| Ash | £££ | High | Light, creamy colour with a clean, straight grain. | Modern and minimalist designs where a bright, clean look is desired. |
Use this comparison as initial guidance, but review a physical sample before making a final decision. Seeing the grain, colour variation, and surface texture in person ensures the timber aligns with your home.
Engineered Panels: The Modern Alternative
Engineered wood panels provide a stable and consistent alternative to solid timber for internal cladding. Manufacturers create these panels by bonding layers of wood or wood fibres together, which increases structural stability and reduces the risk of warping or shrinking in rooms with fluctuating temperatures. For a detailed comparison, see our guide on solid wood vs engineered wood.
This built-in stability supports a clean, uniform finish across interior walls. In fact, wood veneered panels are gaining popularity in the UK internal cladding market because they combine visual appeal with material efficiency and performance. The UK veneered panels industry was valued at approximately USD 310.9 million in 2025 and is expected to reach nearly USD 355.4 million by 2035.
Yakisugi: A Unique and Resilient Finish
Yakisugi, also known as shou sugi ban, is a traditional Japanese technique that preserves wood by charring its surface. The method is most commonly applied to Cedar and produces a dark, deeply textured finish with enhanced surface resilience.
For feature walls where stronger grain expression and greater visual weight are required, charred douglas fir cladding is often specified. Its naturally pronounced grain structure becomes more defined through charring, making it a preferred option when texture and depth are central to the design.
The charring process is not only about appearance; it also delivers clear practical benefits:
- Increased Durability: The charred surface helps protect the wood from insects and rot.
- Enhanced Fire Resistance: The carbonised layer acts as a fire-retardant barrier.
- Unique Aesthetic: The process creates a distinctive silvery-black finish that cannot be replicated with stains or paints.
Yakisugi transforms a standard timber board into a highly expressive architectural surface, making it a distinctive and durable option for any feature walls.
Design Inspiration for Wood Clad Walls
Once you’ve settled on the perfect timber, the creative stage begins: bringing your vision to life. This is where the focus shifts from practical decisions to design possibilities, exploring how internal wood wall cladding can shape spaces that feel personal and distinctive. Rather than simply covering a wall, wood becomes a tool for defining the overall atmosphere of a room.
Wood offers a wide range of design possibilities, whether you want a bold statement or a subtle, textural backdrop. A single feature wall can redefine a bedroom, an unused alcove can become a cosy nook, and a home office can take on a greater sense of natural calm. The key is matching the right idea to the right space.
Creating a Stunning Feature Wall
A feature wall is one of the most popular ways to use internal wood cladding because it adds depth and character without overwhelming the room. A single timber-clad wall acts as a large-scale design element while also making the space feel warmer and more inviting.
In a bedroom, dark, vertically slatted timber placed behind the headboard can create a refined, boutique hotel feel. For maximum contrast in modern interiors, black charred wood cladding is frequently used to create a bold focal wall with depth and texture.The vertical lines draw the eye upward, which makes the ceiling appear higher and enhances the sense of height. When soft ambient lighting is added, the combination of timber texture and light creates an intimate and restful atmosphere.
In a living room, a feature wall made from reclaimed wood can frame a fireplace or television. The varied tones and natural textures of reclaimed timber introduce visual richness and rustic character. This approach grounds the space visually and often becomes a focal point that draws attention and sparks conversation.
Smart Design Patterns and Layouts
The way you arrange wood panels influences how a room looks and feels. The installation pattern changes spatial perception, allowing you to adjust how wide, tall, or balanced a space appears without altering its structure.
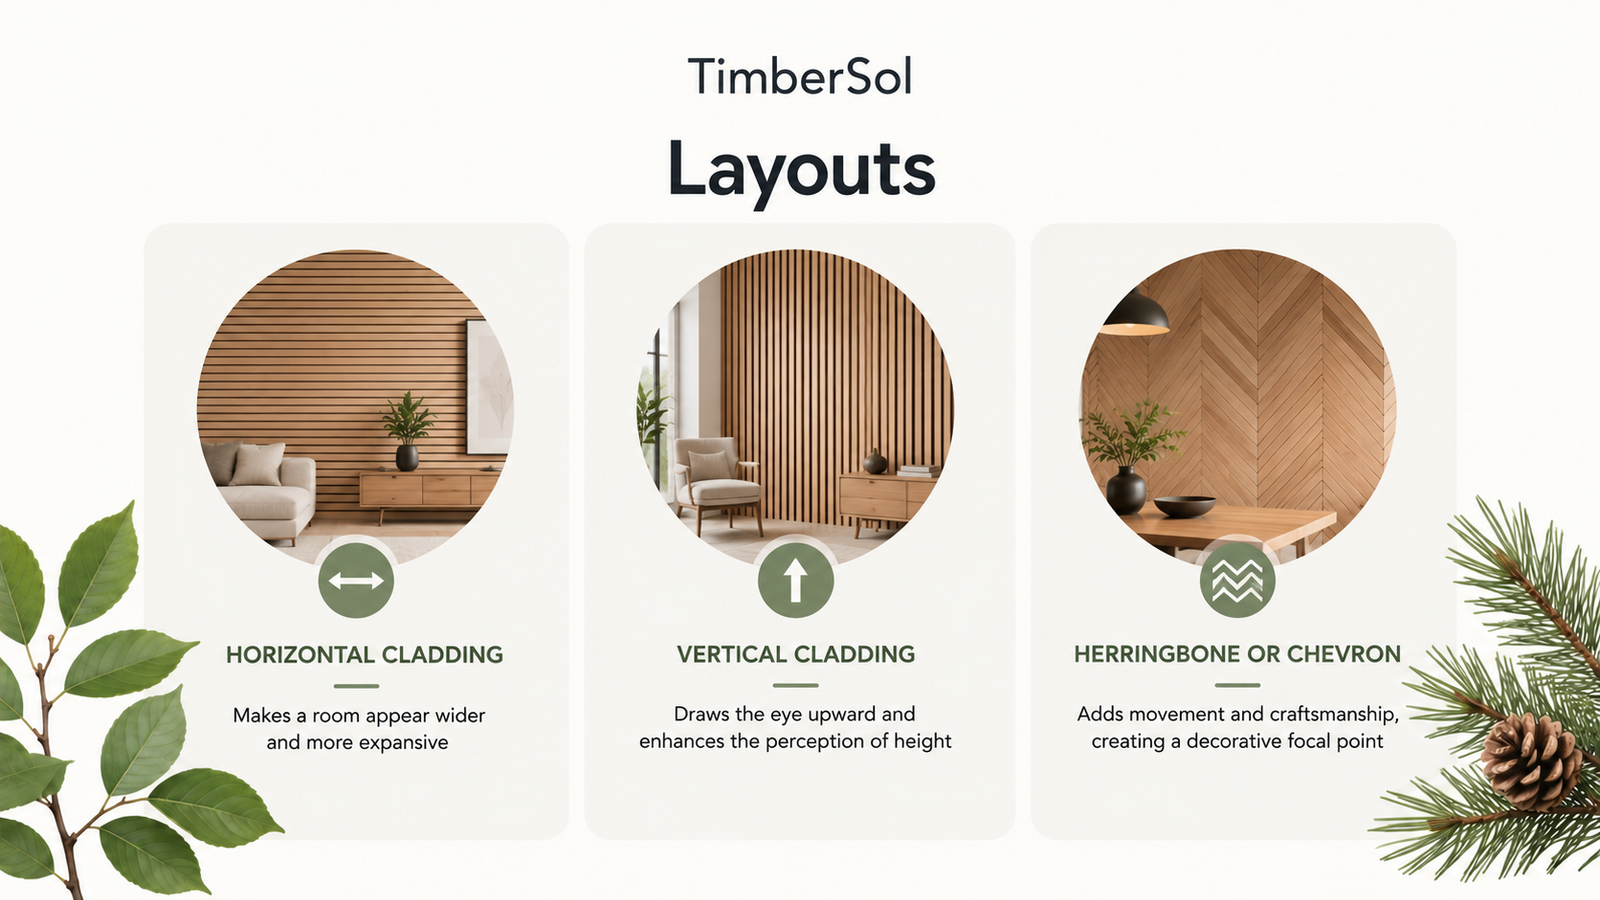
- Horizontal Cladding: Installing boards horizontally makes a room appear wider and more expansive. This layout works particularly well in smaller rooms or narrow hallways, where the extended lines visually stretch the space and improve the sense of flow.
- Vertical Cladding: As we touched on, installing boards vertically draws the eye upward and enhances the perception of height. This technique suits rooms with lower ceilings, as it creates a more open and airy impression.
- Herringbone or Chevron: Using patterns such as herringbone or chevron introduces movement and craftsmanship into the design. These layouts turn the wall into a decorative focal point, making them well suited to dining rooms or entrance halls where visual impact matters.
Cladding direction and pattern function as active design tools. They do more than decorate a surface; they directly influence how you perceive the room’s proportions and spatial balance.
Harmonising Wood with Your Interior Scheme
A wood-clad wall achieves full impact only when it works in balance with the rest of the interior. Lighting, furniture, and colour palette directly influence how timber appears and performs within the space. Strong coordination between these elements elevates the design from visually pleasing to cohesive and intentional.
Lighting plays a central role. Downlighters or wall-washing lights can graze the timber surface, highlighting natural grain and texture while creating shifting patterns of light and shadow throughout the day.
Wood pairs easily with different colour schemes. Lighter timbers like Ash or Pine work well with cool greys and crisp whites for a bright, Scandinavian feel. Darker woods like Oak or Walnut contrast beautifully with deep greens or moody blues, creating a warmer, more enveloping atmosphere. Exploring interior design mood board examples can help refine these combinations.
Finally, furniture should support the overall balance. A modern sofa can contrast effectively with rustic timber, while traditional pieces complement classic oak panelling. The aim is visual harmony, so the wood wall feels naturally integrated into the space.
Where the same aesthetic is carried into garden boundaries for a cohesive whole-property look, charred black wood fencing is commonly paired with charred interior feature themes.
A Practical Guide to Installing Wood Cladding
Turning your design into a finished feature wall starts with solid planning and proper preparation. This section outlines the practical steps needed for a smooth installation, whether you’re tackling the project yourself or hiring professionals. Good groundwork ensures your internal wood wall cladding looks great and performs well for years.
A successful installation begins before the first plank is fixed to the wall. Skipping early preparation often leads to uneven finishes or warped boards later on. A clear pre-installation checklist helps prevent these issues and keeps the project on track.
Your Pre-Installation Checklist
Before installation begins, prepare both the space and the timber properly. Each step directly affects the final result and long-term performance of your internal wood wall cladding.
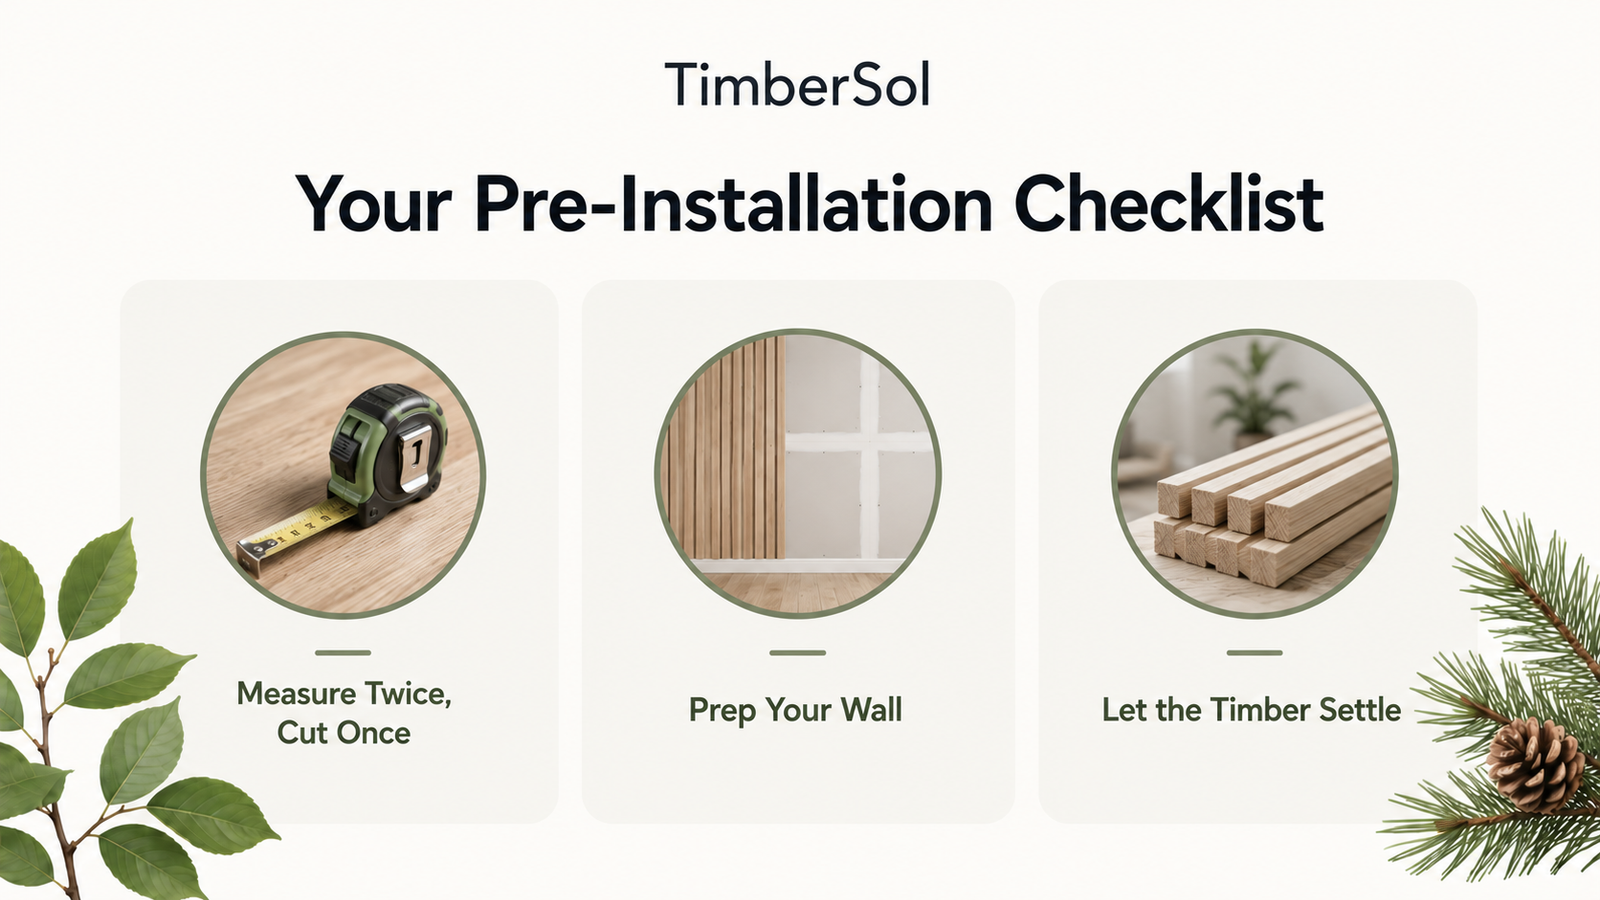
- Measure Twice, Cut Once: Measure the wall’s height and width to calculate the total square meterage required. Order an additional 5 – 10% of cladding to allow for cuts, waste, and minor errors during fitting.
- Prep Your Wall: Ensure the wall surface is clean, dry, and flat. Remove old wallpaper, fill cracks or holes, and check for damp areas that could damage the timber after installation.
- Let the Timber Settle: Allow the wood to acclimatise in the room for at least 48 – 72 hours before installation. Stack the planks inside the space so they adjust to the room’s temperature and humidity.
I can’t stress this enough: skipping acclimatisation often leads to gaps or buckling after installation, as the wood will naturally move once fixed in place.
DIY or Hire a Professional?
So, should you do it yourself or bring in an expert? It comes down to your skill level, the complexity of the design, and the time you have available. A simple, straight feature wall is a realistic DIY project for anyone with basic carpentry skills and the right tools.
However, if you’re planning something more intricate – such as a herringbone pattern – or your wall includes tricky details like windows and sockets, hiring a joiner is a smart decision. A professional has the experience to manage unexpected challenges and ensure every cut and joint is precise. For a more detailed look at the fitting process, check out our full guide on the installation of cladding.
Key Installation Stages
Once the preparation is complete, you can move on to the main installation. The most common and reliable method is to fix battens – thin timber strips – to the wall first. These battens create a stable, level framework for attaching the cladding and leave a small air gap behind the boards to allow ventilation.
- Fit the Support Battens: Install the battens horizontally if the cladding will run vertically, and vertically if the cladding will run horizontally. Use a spirit level to ensure they are perfectly straight, and space them approximately 400 – 600 mm apart.
- Cut Your First Plank: Measure and cut the first plank carefully. Position it perfectly straight and level, as every subsequent board will align against it.
- Fix the Planks: For horizontal layouts, begin at the bottom and work upwards. For vertical cladding, start from one side and move across. With tongue-and-groove boards, fixings can be driven through the tongue at a slight angle. The groove of the next board then slides over and conceals the fixing – a method known as secret nailing.
Keeping Your Wood Walls Looking Beautiful
You’ve invested in the warmth and character of internal wood cladding, and maintaining its appearance is straightforward. Consistent, light care ensures your timber walls remain a strong design feature for years – even decades.
Maintenance depends on the timber finish. Natural, oiled, and lacquered surfaces each require slightly different care routines. In most cases, regular dusting with a soft microfibre cloth is enough to prevent dust from settling into the wood grain.
If marks or spills occur, act quickly. Use a slightly damp cloth with a mild, pH-neutral wood cleaner to remove residue. Avoid harsh chemicals, abrasive pads, or excessive water, as these can damage the protective finish, stain the timber, or cause swelling.
Routine Care And Minor Repairs
Life happens, and minor scuffs and scratches are inevitable, but most can be repaired easily with the right approach.
- For oiled finishes, light scratches can often be corrected by gently sanding the affected area with fine-grit sandpaper. After sanding, apply a small amount of matching maintenance oil to blend the repair seamlessly with the surrounding timber.
- Lacquered surfaces can be harder to repair invisibly. For minor scuffs, a specialist touch-up pen or wax filler stick in a matching shade can effectively conceal the mark.
Wood maintenance should be viewed as preservation rather than a chore. Regular light cleaning and occasional touch-ups protect the timber’s finish and ensure it remains a lasting feature within your home.
This proactive care aligns with the continued growth of timber features in UK homes. The UK timber cladding market rebounded strongly after the pandemic, growing by over 6% in 2021, supported in part by a private rental market comprising 4.43 million households. Further data is available in the United Kingdom timber cladding market report.
Knowing When to Refinish
Even well-maintained internal wood cladding can begin to look worn after many years, particularly in high-traffic areas or in rooms exposed to strong sunlight. This does not indicate damage; it signals that the surface is ready for refinishing.
- Oiled Finishes: Oiled timber is straightforward to refresh. When the surface appears dry or loses depth of colour, applying a new coat of maintenance oil restores richness and protective sheen.
- Lacquered Finishes: Refinishing lacquered timber is more intensive. The process typically requires sanding the entire surface before applying new lacquer coats. This step is usually only necessary after extended use.
Selecting appropriate protection products from the outset supports long-term durability. For more on protecting your timber, it’s worth looking into non-toxic wood preservatives that can provide durable, long-term protection.
Got Questions About Internal Wood Cladding? We’ve Got Answers.
You’ve explored the design possibilities and practical benefits of internal wood cladding, but a few detailed questions may remain. This section addresses the most common queries directly, helping you move from inspiration to confident decision-making in your own home.
Can I Really Put Wood Cladding in a Bathroom or Kitchen?
Yes, you can install internal wood cladding in bathrooms or kitchens, but material choice and preparation are critical. High-humidity spaces expose timber to moisture and steam, so selecting the right wood prevents long-term issues.
Choose timber with natural moisture resistance. Cedar performs well because its natural oils provide water-repellent properties. Thermally modified timber is another strong option, as the treatment process increases stability and moisture resistance.
Where maximum stability is required, particularly in bathrooms or kitchens, charred accoya cladding is often specified for its low movement and long-term consistency. Standard softwoods such as pine should be avoided unless they are thoroughly sealed.
Ventilation is essential. Effective airflow reduces steam build-up and protects the timber surface. Every board should be sealed on all sides before installation. Position cladding away from direct water exposure – use it for feature walls rather than inside shower enclosures or directly behind sinks.
What’s the Damage? How Much Does Internal Wood Cladding Cost in the UK?
The cost of internal wood cladding in the UK varies depending on the timber species and finish. The good news is there are options for most budgets.
Approximate material costs per square metre:
- Basic softwood (e.g., Pine): from around £20 per m².
- Premium hardwoods (e.g., Oak): typically £60 to £100+ per m².
- Specialist finishes (e.g., Yakisugi): often £100+ per m².
Just remember, these figures cover the timber only. You should also budget for battens, fixings, protective finishes, and – if required – the cost of a professional installer.
Internal wood cladding should be viewed as a long-term investment rather than a short-term decorative upgrade. Its durability and timeless character contribute lasting value that standard paint finishes cannot replicate.
Is Wood Cladding a Fire Hazard?
No, internal wood cladding is not a fire hazard when it is properly treated and certified to meet UK fire safety regulations.
Although wood is naturally combustible, modern cladding products can be treated with fire-retardant solutions to achieve a Class 1 or Class 0 fire rating. These ratings measure the surface spread of flame and confirm compliance with UK building standards.
Always check the certified fire rating before purchasing and ensure the product meets local building regulations, especially for commercial properties or walls along escape routes.
Is Wood Cladding an Eco-Friendly Choice?
Yes, wood cladding can be one of the most sustainable choices for your home – provided the timber is sourced responsibly. The key factor is ensuring it comes from well-managed forests.
Look for these main certifications:
- FSC (Forest Stewardship Council) – the global gold standard that ensures forestry practices are environmentally responsible and socially fair.
- PEFC (Programme for the Endorsement of Forest Certification) – a major international alliance dedicated to promoting sustainable forest management.
Choosing certified timber means you are using a renewable resource harvested in a way that protects forests and their ecosystems for future generations.
Bring timeless character into your interior with premium Yakisugi cladding. At TimberSol, we specialise in crafting stunning, durable, and sustainable charred timber that delivers depth, texture, and long-lasting performance. Explore our range of high-quality Yakisugi products. Learn more at https://timbersol-backup.elnoirstudio.com.